Showing posts with label home remodeling. Show all posts

3.17.2010

Caution! Saw May Be Sharp!

Word to the wise: sharp things can hurt you. If you buy something that is sharp--say, a precision machine designed to cut wood by spinning a 10-inch blade at nearly 4,000 RPM--then it's reasonable to suggest that you know what you're getting into. Namely, that you know it could cut you if you happened to touch that spinning wheel of death.

If simple common sense isn't enough, the liability-shy manufacturers make sure to plaster DANGER: WILL ROBINSON!!! warnings all over their tools. So much so that the warnings take up more of the manual than the "how to operate this tool" section.

I'll admit that my table saw is an imposing piece of machinery. It's intimidating, and I treat it with a healthy dose of respect. Much like I would get into full battle garb and carefully plan all my movements when dealing with HCl or infectious bodily agents in the lab, my table saw gets special consideration in my pantheon of tools. Now that I think about it, some of my hand-held tools are probably more dangerous with regular use, but there's something about the table saw when it's going full speed. It is serious.

So if I told you that a Boston-area man bought an entry-level table saw from Home Depot in the mid-2000's and when he mangled one of his hands in 2006, he sued and just won a $1.5M verdict, would you be surprised?

Sadly, you probably wouldn't, and neither would I. Still, the patent absurdity of a jury awarding some bozo a ton of cash because the extremely dangerous tool he bought turned out to be exactly as advertized. . . well, it's beyond the pale.

His side argued that some prohibitively expensive safety feature exists that can sense when the saw blade touches human skin and stop the blade, and the manufacturer was negligent because it hadn't included it. Sigh.

Just because a safety measure exists does not make a company liable for selling a product that is exactly what everyone knows it is. If the company said "no one can ever be injured with this table saw, ever, never, NEVER!" then sure, they'd be liable. But they went in the exact opposite direction, warning about SERIOUS INJURY AND DEATH on every open square inch of the product, its packaging, and its manuals. Thus, one might expect that extra care was warranted in using said product, and if one's hand gets mangled, it's probably because one was being a fucking idiot while using it.

I'm sure this is the same line of thinking that reasonable people were bandying about when that old crone spilled hot coffee on her lap, and--my oh my!--burned the crap out of her legs. Still, rampant stupidity and abdication of personal responsibility for one's own well-being and life must be called to the carpet when it rears its head. Even if it's lost on too many to be any good.

At least one commenter on the Boston Globe article got it right when he summed it up thusly:
The hammer manufacturers will be next, for not including thumb detecting radar.
It really is that sick and stupid.

2.22.2010

The Stairway, She Is Finis

It's done. As I was afraid of, our oldest dog just couldn't handle the slippery stairs so installing a runner became a high priority. I went to Lowe's on Saturday, haggled with the manager to let me buy 30' from a roll that was to be discontinued and was wrapped up on a palette in the back, and went to work.

The straight run of stairs was very easy, but the wedge-shaped stairs were not. To put it mildly. In order to handle the turn, I decided to do what the pros do and make mitered cuts in the runner and bind the seams together to make the turn. I don't have photos of that, but you can see what examples I used here. With some projects, I finish up and think, "This would actually be a fun job to have. I wouldn't mind being a carpenter/mason/landscaper/etc." Not this job. Laying carpet would rank up there with plumber in my book of terrible professions.

Here is the before--from when we went on the home inspection in August, 2005--followed by the after.


When I look at these, I wonder what the hell I was thinking in doing this project. It looked fine before. But then I recall how much I despised--yes, despised--that skinny newel post. It was wrong. It was an abomination. And the carpet was dull, dingy, and getting worn out. That carpet went up onto the second floor landing, which I ripped up when I gutted and reconfigured the landing and hallways. You can see the flooring-in-progress in the first photo of this post. So, it was necessary after all. And it does look better now.

2.17.2010

The Stair Project -- An End is in Sight

The ongoing saga of my staircase is (almost) over. Just under a year ago, I posted a detailed account of the installation of a new custom-made newel post. Make sure to check it out for reference photos. Soon after that, I stained and varnished it, but made some mistakes in the finish that needed to be fixed. And there it sat until this weekend.

My wife took the kids to visit her parents in PA and they return tomorrow, so I took the holiday weekend plus a vacation day yesterday to get as much done as possible. My tasks were to
  1. Repair the finish on the newel post and railing
  2. Construct and install a curved stair, and replace missing cove molding under some stairs
  3. Paint the stairs, trim, and balusters
The staining and varnishing went off without a hitch. I then added to my project when I realized that I should strip and repaint the trim on the stained glass window in the stairwell. This led to getting out a ladder and reglazing one of the panes that nearly popped out while scraping the flaked paint. Sigh.

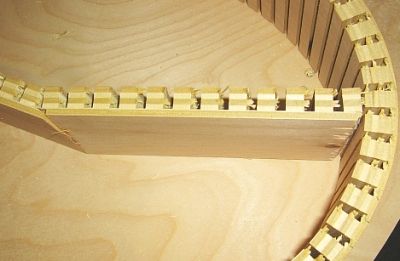
The curved stair was quite a project. Contrary to popular belief, inch-thick pine boards don't bend easily. To make the curved riser, I had to use the table saw to painstakingly cut 30+ kerfs in the back of the board which allow it to bend. To make the curve on the tread, I just used a jigsaw, but then had to buy a new router bit to match the bullnose profile of the rest of the tread. And finally, I needed curved 5/8" x 3/4" cove molding for under the overhang of the tread.

I called all over eastern MA to find someone that carried flexible molding, but no one did. I tried cutting kerfs in pine molding like I used on the other stairs, but because of the cove profile I couldn't take off enough material to make it flexible. Thus, I had to custom make my own cove molding from a 1" x 10". I cut out the outer edge of the curve with the jigsaw, bought a cove bit for the router, cut the cove profile, and then jigsawed out the inside edge. I popped it on and it fit perfectly! All told, the molding was much easier than I anticipated.

After all that, and then coat after coat of paint, this was the result (it's a phone photo, so the quality isn't great. Also, don't forget to check out my previous post for "before" pictures.)

One thing I learned this weekend is that painting balusters is a royal pain. If I never have to do it again it will be too soon. I'm glad I looked up tips for doing it, though. The tip I read said that using a paint brush is a bad way to go--it takes forever and the results aren't good--and instead one should use a painting pad. I just happened to have an old one that I cut in half, and it really did work quite well.

The last phase of the project--one which I will have to do in the next week--is installing a carpet runner on the stairs. The high gloss paint is rather slippery for man and dog alike, so this one can't wait a year.

11.22.2009

Chimney Update

To satisfy those who were waiting with bated breath to find out how the chimney project worked out, I'm happy to report that it's done and it seems to be water tight.

It's not gorgeous, but the chimney was pretty rough to start with. All in all, I'd say it was a successful project, though the next Nor'easter that comes through will be the real test.

11.18.2009

Leaky Roof - The Tale of an Unexpected Project

Nothing rockets a project to the top of the home repair priority list like a leaky roof. A recent severe rainstorm showed that the quick-fix tar patch I applied to the chimney/roof junction two years ago during a similar rainstorm had finally given out. Luckily the chimney is in the unfinished part of the third floor (attic) so nothing was damaged. Rather than patch it again I checked the weather (clear until Friday) and decided to do it right and reflash the whole chimney. FYI, the flashing of a chimney, when done properly, has two parts: step flashing and counter flashing. Together, they keep water where it should be: flowing quickly down the roof and into the gutter. Here are some diagrams to help explain the system: These diagrams show the ideal system. What, you may ask, was I dealing with? Well, my house is over 120 years old, and let's assume that the last time the chimney was properly flashed (usually done when a new roof is put on) was 60 years ago. At some point it started leaking and homeowners added tar to stop it. Tar breaks down in UV light and then cracks. Water gets in the cracks and leaks through. Based on the tar buildup outside and the water stains on the rafters and chimney inside the attic, I'm guessing previous homeowners did the every two year quick-fix through the last half-century. I don't have a photo of my chimney before I started working, but here is an example that looks similar, though not as bad as mine (courtesy of a very helpful site). Note that here you can see some of the counter flashing, but mine was totally covered in tar.On Sunday, I hacked off nearly 80 lbs of old tar, by my highly scientific guesstimate. The upper face of the chimney is only a few inches from the roofline, so there is a small valley there that collects debris, snow, and water. Instead of building what is known as a chimney cricket (basically a mini roof), previous owners simply loaded the valley up with tar so that it was nearly flush with the roof peak. And of course, it was full of deep cracks. On Monday, I took a half day from work and tuckpointed all the deteriorating mortar joints that I exposed after ripping off the old flashing. This was an unexpected problem I had to deal with, though not surprising. After so much water and so much time, much of the mortar was basically dust. I'm surprised the chimney hadn't collapsed. So this bump in the project was urgently necessary to keep the thing from crumbling as I worked on it. Tuesday, I was up on the roof at 8am, installing a small cricket that I had built the night before, and then I used the masonry blade on my circular saw to grind out the old lead counter flashing that I hadn't been able to remove with a hammer and chisel. I used aluminum for all the step flashing. It's very durable for the cost, and relatively easy to work with. For the counter flashing, I'll use lead. The first step was to fabricate the base or apron flashing (see photo) and then proceed from there up the sides of the chimney, weaving the step flashing and the new shingles (I had to rip up a bunch of shingles because of the tar).By the end of the day I had completed the step flashing, including fabricating an aluminum cover/apron for the cricket at the roofline, and finished all the shingling. Oh, and I was lucky that the previous owners had left a couple packets of matching shingles so I didn't need to try to match new ones to my roof. Here is what the job looked like near the end of the afternoon as the sun was getting low on the horizon.The channels cut in the joints will be filled in tomorrow morning when I embed the lead counter flashing with portland cement mortar. I'm using lead here instead of aluminum because 1) I need the flexibility of lead on the cricket because of some exposed seams in the base flashing, and 2) because aluminum corrodes when embedded in portland cement. Also, when the roof needs to be redone in 5 or 10 years, I'll be able to just bend up the lead to put in new shingles and step flashing. I'm not done, but the end is in sight, and I should easily be able to finish the job tomorrow morning. Yes, I know. Famous last words. ------------------- Update: Everything worked out as planned -- see my follow-up post -- and through multiple rain storms and high winds, the attic has remained dry as a bone.

4.27.2009

New Newel

My weekend project was installing a new starting newel post. And yes, I picked the nicest, sunniest weekend since last summer to do it.

What's a newel post, you ask? And why did I need a new one? Newel posts are the main posts at the top and bottom of a run of stairs that the railing connects to 1. The starting newel is usually bigger than the post at the top of the stairs, especially in old houses. And this is why I needed a new one.

The newel post at the top of the staircase is original to my 120+ year old house. It's 4 inches square, and custom turned with nice detail. See photo (taken last year while I was installing new oak flooring):
The starting newel, however, was not original to the house. Perhaps the original broke, but I'm inclined to think that some previous owner replaced it so they could install a curved bottom step. Anyway, the following is what the wimpy little newel looked like when we bought the house (note the wallpaper and carpet, which are now gone as the renovation of the stairs and hall moves along).
This awful thing was 3" square, and devoid of any interesting detail, which means it was noticeably smaller than the 2nd floor post. My wife said she never noticed it, but I couldn't see anything but this abomination. So I found a wood shop in Canada that would make custom turnings based on photos and measurements.  I took a bunch of photos of the 2nd floor post with a tape measure next to it, and had a 6-inch square starting newel made to match. That was just over a year ago, and it had been sitting in my basement since then, taunting me. Here it is, upstairs and waiting to begin its life securing the railing of my staircase.

Finally, a few weekends ago on a dreary day, I said to hell with it and cut out the skinny piece of junk and ripped out the bottom stair. Then -- as projects in a house with kids so often do -- it sat that way, with a temporary board as a step, for two weeks until I could get to it again. On Saturday, I started prepping for installing the post, and by midday Sunday, this is what it looked like.

This, needless to say, was a royal pain in the ass. Retrofitting anything like this is difficult, and it was complicated by the very tight spaces caused by the radiator. Note the big hole under the stair -- cut in the ceiling of the basement stairwell to provide easier access -- and the rectangular hole in the flooring to the left, which I cut so that I could feed part of the newel down through it to be bolted to the floor joists below... or so I thought.

Newels installed like this, spanning two steps, need to be notched to fit over the riser and stringer (see diagram below). If you look at the tread on the second step, you'll see a notch I cut in it as well. Imagine a 6" square block of wood with a 3" x 3" notch cut out of it, resting on the second step. Confusing? You'll see what I mean in a minute.

My circular saw has only a 2 3/8" cutting depth, so getting the notch cut was another royal pain. After I got the initial cuts made and realized I had no way of finishing them (none of my hand saws were long enough) my wife saved me by suggesting that I use a drill to take out enough material to get most of the block out. It worked, and I cleaned the rest of the notch out with a wood chisel.

Back to the whole passing part of the post through the floor thing... turns out I miscalculated when I ordered the post, and the post wasn't long enough to go all the way through. So it only goes about 3/4" below the surface of the oak flooring. Oh well.

Surprise of surprises, the damn thing fit on the first try. I didn't need to make any additional adjustments. The post was plumb, it lined up with the cut I made in the railing, and the notch fit perfectly. Three lag screws in the base, one from the railing into the top of the post to connect them, a few brackets and wood screws in the base for extra stability, and voila! (and please excuse the stairs... I said the whole thing is a work-in-progress)
Staining and finishing it is going to be a pain, especially because of the tight space behind the radiator. I'll sand the finish off the railing and the other post and try to get a consistent stain across old and new. I may have to resort to a paint or shellac or something though, because the new post is pine and all the old wood is oak, and thus will take stain differently. And of course I need to rebuild the bottom step. I haven't yet decided whether to make a rounded one, or a squared one. I'm leaning toward rounded, so that will be another fun project, that I'll get to... next week? Next year? I hope my wife doesn't read this...


1. If you're interested in what all the parts of a staircase are, see the following diagram:

2.17.2009

Home Improvement -- Restoring a Front Door

One of the charming parts about my house (reminder: 1880's Stick Victorian style) was that the front door was a French door. It was all glass and really fit the style of the house. However, there were a few big problems with it. First and foremost, the total width of the door opening was only 36 inches--regular door width. This means that in regular usage (with one side kept stationary) when the door was opened there was only half the amount of space to go through than is normal. The stationary side could be opened, but it was difficult to do with bags of groceries in your hands, so we were often left to shimmy through sideways. The second problem was that it was an old door with non-tempered, non-insulated glass, and there were gaps along all the edges. In winter, it was like a wind tunnel of cold air. We resorted to hanging a big heavy curtain inside the door, much like restaurants do, to keep the cold out.

With heating oil prices sky high at the beginning of the winter, I finally decided to get a more traditional single panel door. But not wanting either a cheap-looking steel or fiberglass door, or to shell out $1600+ (at least) for a custom solid wood door, I decided to buy a salvaged door and restore it.

I drove down to the closest large architectural salvage business and picked out a nice solid wood door with a single (empty) cutout for glass that was in very good shape -- minimal marring of the wood, and it was just the right size. I only needed to strip and refinish it, and get a new piece of glass and new hardware. The door itself was $200.

I also bought an antique brass lockset for $20 that was just the right size and only needed cleaning and refinishing. Here is a photo of the lockset, after I was about halfway done with the polishing:Note that this is an old style mortise lock, where the piece in the top right of the photo is inserted into the edge of the door. Also note that all of the pieces, including the faceplates, are solid brass, very heavy, with a wonderful feel to them. It's difficult to determine the age of this particular lock, but my guess is that it's roughly 100 years old, give or take a couple decades. The interior working parts are solid cast brass, and all they needed was some cleaning. It's remarkable how well this mechanism still works.The above photo is the interior of the lock. I took the picture before I dug in so that I could put it all back together if one of the springs popped the pieces all over. The catch is missing in the picture because I had already removed it to clean it. Another amazing thing about this mechanism is that newly manufactured versions look almost exactly the same. The technology has needed minimal updates in well over 100 years.

In the midst of this activity, I was sanding, staining, and finishing the door itself. After extensive research into dozens of options for stain and urethane (or lacquer or shellac or tung oil...) I decided to go with what I could get at Home Depot for lack of conclusive reason not to. I used MinWax Dark Walnut Stain and Sealer, and MinWax Helmsman Spar Urethane. Having never finished woodwork before, this took some trial and error, but after many many coats, I finally finished it. (this took weeks and weeks, what with the holidays, birthdays, work, etc.)

Also during this time, I ordered a new piece of glass for the door. It turns out that they can put a nice beveled edge on tempered glass, which is great because it really adds a touch of elegance to the glass, and fits with the vintage nature of the house, the door, and the hardware. That was $95.

Add in another $75 for solid brass hinges that match the hinges in the rest of the house (and including all the incidentals and supplies I didn't mention above) and the total cost for this project came in under $500. I installed it this past weekend and it actually fit! I had measured and measured and was pretty sure it would, but you never know. Not a great photo, but you should be able to make out how well the polishing of the brass knob worked, as well as the faint outline of the beveled glass. The thing to the left is one of the panels of the old French door. Once the weather is consistently warmer, I'll strip and refinish the trim to match the color of the door.

The foyer is no longer a wind tunnel, which is one immediate benefit of the project. I can now walk in the front door without turning sideways, and my dogs can't see out the door and bark at every person or squirrel that happens by. And when I pull the door shut, there is a solid, deep, resonating sound of pleasant finality -- ka-THUNK!

----------------
Update: My wife took a better photo of the door (see below), and we also discussed painting the trim the color of the rest of the house trim rather than staining it to match the door, to make it pop. That idea was thanks to this month's This Old House Magazine that arrived yesterday with a multi-page spread about updating your front door, and another spread detailing staining and finishing techniques. It was only two months late to help...

7.14.2008

Home Renovation as Productive Achievement

A discussion I had with Deb in the comments of a previous post deserves its own place in a dedicated post. In the context of discussing a home renovation project, Deb made the offhand comment that our topic had nothing to do with Objectivism, but that she appreciated my suggestions on her own home-improvement project (fixing a leaking slate patio and the garage underneath it). Here is a slightly edited version of my response :


It doesn't have anything to do with Objectivism? No, I guess not. But it certainly has everything to do with enjoyment of life on earth, and molding our environment to suit our needs and wants.

This is one of the reasons I love working on my house. I bought a nice, perfectly fine house for a reasonable price. But I saw potential, and what I could make of it if I applied myself. It's taking shape, and is already SO much better than it was. And I'm only 2 years into it. With my mind and my hands, I'm "making something from almost nothing". I'm solving problems, coming up with creative solutions, making my family's life better, and increasing the value of our investment.

Howard Roark loved to work in the granite quarries, or on a construction job working with his hands. I think this is why. It's the meeting of ideas and physical exertion, dedicated toward greater values. I'm exhausted right now -- still! -- but I love it.

So this topic isn't related to the study of Objectivism, but it is an expression of a fulfilling, value-driven, rational life. I know I'm waxing poetic about ripping up floorboards or patching grout, but dammit, there is nothing better than spending a month of weekends doing something like this, and then watching your kids playing on a patio you fixed, and then pulling your perfectly clean car out of your garage.


While thinking about this topic again, I started wondering about the history of home renovation in America, and our supposed "addiction" to it. On a public radio website, I found an interesting piece titled, "Is Home Depot Your Pusher?" Despite the title, it isn't wholly negative concerning Home Depot's role in creating a new market for do-it-yourself home improvement. A college professor who wrote a book about the company had the following to say:
"I think they created that demand," says Roush. "If you go back to the 1960s, 1970s, if you wanted repairs done on your home, you were hiring the local carpenter or the local electrician to come do that work on your house. And what they've created is this psyche that, hey, this kind of stuff is easy to do."

And so [Home Depot] makes a profit and you spend your money. Still, Roush says, the tangible benefit to the homeowner enhances the popularity of obsessive remodeling.

"Overall," he says, "the housing market today, the stock of houses that we have, are in much better shape than say the housing market 40 years ago-pre-Home Depot-because the average homeowner is more likely to be concerned about the upkeep of that house and want to make those repairs." [bold added]
I would expand on this and say that pre-Home Depot, the homeowner with a cracked wall or inefficient use of space may have wanted to fix the problems, but the materials were likely harder to find and more expensive, and the knowledge to do it wasn't as pervasive. On top of that, I would be surprised if contractors -- the "local carpenter" type from Roush's quote -- of the good old days were any more reliable, qualified, or affordable than those today. Now the average homeowner can watch HGTV, then take a short trip to the big orange store, and tackle the project himself. He doesn't have to pay for labor, he can customize everything to his own tastes, and in the end he can feel the pride of accomplishing a goal. It's a win win win situation!

On top of that, a side benefit to all of this is the wicked delight I get when I think about all the work people are doing on their homes without getting a permit.

What the Home Depot revolution has done is give Americans back part of their heritage, hearkening back to more independent times, when one could build a house on his own land, with his own hands, and not have to grovel to a zoning board for permits, or beg for a positive outcome from a community comment session.

And because this post wouldn't be complete without a real-life example, I present the finished slate floor in my kitchen!

6.23.2008

So... Tired...

I feel like I've been beaten about the legs, back, arms and chest with a bat. It's difficult to walk down stairs, or get up from a chair. All because I spent the weekend ripping out ancient hardwood flooring in my kitchen, and installing the first layer of underlayment.

For some background, my house is a 120 year old Victorian, and over the past two-plus years I have been making improvements and renovations. It's slow going because we still have to be able to live in the house day-to-day, and having two small children means no late-night projects. Also, we are budget constrained, and thus I do all the work myself, as well as make creative use of the space we have rather than building major additions and the like.

In the spirit of keeping to a budget, I'm making limited updates to our small galley kitchen instead of gutting it and starting from scratch. For instance, instead of adding on, I cut out the wall between the dining room and the kitchen, and will be installing a bar/island which will give us more counter space and storage, and provide additional casual seating. Also, it means leaving the old but still functional cabinets in place.

In this photo from 2 months ago (sorry for the poor quality -- it's all I have available right now) you see the first stage of the wall demolition, looking from the dining room to the kitchen. I told you it was a small galley kitchen. In the second shot, you can see from the back door into the dining room. Soon after this, the remaining studs were removed and I put in a header across the span.

OK, back to the flooring. T and I decided that I may as well rip out the old bouncy wood floor while the walls are torn up, so I started that job Saturday morning. It's hard to describe how much I hated that floor. It appeared to have been cobbled together with a mix of nice oak and whatever scraps the original builders happened to have lying around at the time. Some boards went side-to-side, some front-to-back, and there were random 1 ft. wide pine boards thrown in. It made me insane. Though I wasn't looking forward to the work, I knew it would be worth it.

Remember that I said the kitchen cabinets are staying? This meant that roughly 70% of the boards I ripped up had to be cut flush with the bottom of the cabinets using a reciprocating saw in order to remove them, while leaving the supporting floorboards under the cabinets intact. This is exhausting, back-breaking work. After 5 straight hours of labor, the wood floor was gone, leaving just a single layer of 1" thick sheathing. The sheathing is pretty sturdy -- none of the bouncy squeakiness we were accustomed to -- so it's clear that 120 years of water and foot traffic had just warped the old floorboards.

Then, bright and early Sunday, I went to Home Depot to pick up what I thought would be just a few sheets of plywood to create a solid sub-floor. Thankfully, I spoke to Kelly the Flooring Expert (after getting a bunch of half-assed advice from other people there) and came up with the following plan:
  1. Because the 120 yr old sheathing is bound to be spongy, even though it feels pretty solid, she recommended putting down 1/2" plywood first (not thicker, because I don't want much more than one inch of total height from the sheathing to the top of the tile).
  2. Then, a layer of 1/4" HardiBacker. It's a cement board similar to Wonderboard, but easier to work with and thinner. This is glued down to the plywood with thinset, and also screwed into the plywood with special screws.
  3. Finally, install the tile (I'm leaning towards slate, which would then have to be sealed).
This is more involved and significantly more expensive than I had been planning on, but I think it will be extremely stable and waterproof. I only got as far as laying down the first layer of plywood yesterday, but already I can feel it is more solid, and it will only get better with the HardiBacker on it.

In anticipation of installing the tiles sometime in the next few weeks, does anyone out there have any experience with either installing or simply owning a slate-tiled floor? I was told that if I use a really good sealer, it will be maintenance-free for a couple of years, and then will just need to be sealed again periodically. I'd really like to use slate because it will tie in nicely with our bluestone patio.

For now, the kitchen is in a state of half-doneness, just like most of the rest of the house. Sigh.

6.02.2008

Other things, et cetera, and so on #6

A Good Kind of Exhaustion

The weather Saturday--rain showers off and on all day--put a kink in my grandiose yard work plans, but Sunday was perfect. I mowed, weeded, trimmed, put the cover and mosquito netting back on the gazebo on the patio (it makes the patio usable even in the hot afternoon sun), pruned some bushes, overseeded and fertilized a sparse patch of grass, sanded and stained my favorite rocking Adirondack chair and ottoman, and picked up a special-order kitchen cabinet that will form a new breakfast bar in-between the kitchen and dining room.

Today, I feel like I spent the entire day at the gym. Everything hurts. But I got so much accomplished, and I always feel a twinge of satisfaction when I feel a twinge in my muscles after a hard day's work. Now I just have to try and not think about all the projects I didn't get to.

A First Time for Everything

I rarely take these online quizzes--or memes, though this use of that word always sounds inappropriate in the context of what amounts to little more than a chain letter--and even when I have taken them, I haven't posted my results. But after Monica, RationalJenn, and Gus all posted their results for the "What Kind of Flower Are You?" quiz and they were all quite different, I thought I'd see what the deal was.

You Are a Canna
"You stand up for what you believe in, even if it gets in the way of what other people think. You are proud of yourself and your accomplishments and you enjoy letting people know that."
This was too good to not post! Though I wouldn't say I particularly enjoy actively letting people know about my pride. What's the point of that? Sounds like the person who made the quiz doesn't have a full grasp of the true egoistic nature of pride. Which brings up my next point...

When I have taken these quizzes in the past, it has always made me wonder how they are created. Some of the questions are just bizarre or oddly leading in one way or another. I'm guessing that someone creating a quiz would decide beforehand on 5 or so "personality types", associate them with some sort of object/fictional character/whatever that represents it, and then assign points to each question and a score range to the answers.
  • 5-15 points - "You are a microwave! -- you are quick to anger, your moods are often uneven, and some people consider you superficial."
  • 16-25 points - "You are a refrigerator! -- you are well educated and maintain a wealth of information, you are very reliable, but some people consider you cold."
  • etc., so on and so forth.
Does anyone have any insight into how these things are done? And yes, I know I'm reading waaay too much into these silly things, but that's part of the fun.

3.07.2008

This Old "Green" House

As I mentioned previously, I enjoy home improvement projects, and do all the work myself. What I didn't mention is that I hate paying other people to do work for me. So my motivation in these projects, and in doing them myself, is three-fold:
  • I enjoy the productive activity of moving walls, running electrical or plumbing work, building new floors, etc., and doing it well. My standards of perfection are much higher than a contractor's. And it's a great weekend contrast to sitting in front of a computer screen all week.
  • Everyone in the family benefits when the rooms are more open, updated, and usable.
  • I save a shi'ite load of money sourcing the materials myself, and not paying labor or permitting fees. And yes, I'm smart enough to read a book on good construction practices and install an electrical circuit without government oversight, thank you.
Because of my penchant for this kind of thing, because of the age of my house, and because of my Boston-area location, the This Old House franchise is a favorite of mine. I watch the shows when I can, and I subscribe to the monthly magazine. Sure, their projects are over-the-top for my budget -- as much as I'd like to have $300K lying around to spend on doubling the size of my house, that's a little bit of a stretch for me right now. Maybe after the summer. Of 2020.

But there are still plenty of great ideas to work from, and many of the problems TOH's subjects have are similar to my own. I look forward to the magazine every month. But lately, I've noticed a disturbing trend.

TOH is turning green.

Over the past year or so, I've noticed an uptick in the number of environmentalist-related articles. But in October 2007 they had an entire issue dedicated to Green Remodeling, and since then it seems like eco-friendly building crap has taken up a good 30-40% of the magazine each month. With TOH Magazine, you can now learn about how your choice of sustainable bamboo flooring will impact your "carbon footprint". As annoying as this infiltration of environutjobbery is, the magazine is still worth reading. I just skip those parts. But if the magazine starts to follow this TOH-online article, I may just have to cancel my subscription:

Growing Up Green
Technology, politics, economics. While the future of the green movement might be shaped by these large, complicated factors, the question of whether sustainable trends can be sustained themselves really comes down to the next generation of homeowners—children. And as parents and educators can attest, the outlook is promising.

"We actively cultivate sustainability awareness with them, and they are quite receptive to the messages," says Michael Klug of his two children. "My sons rail against SUVs even more than I do."

I have to say, this is not what I'm looking for when I open a home remodeling magazine. However, the worst thing about this is...

There is a market for this stuff.

TOH isn't stupid. They are responding to market forces and putting out content that their customers want to read. Assuming they are shifting their focus based on customer data and feedback (a reasonable assumption), this means that people are clamoring to find out how to 'live green', even in their simple bathroom updates. This is depressing.

And while the case can be made for conservation of energy in your house to lower your bills -- I do it too -- TOH is trending away from the Good Ol' Yankee Thrift of keeping your costs down, and instead the undertone is the tired old environmental moralism. "Not only will you reduce your bills, but you can sleep easy at night knowing that your greed and materialism is not killing the planet."

Well, This Old House, I'm letting you know now that you are on notice. Keep this trend up, and you'll lose my $12 per year. So shape up.

-C.